
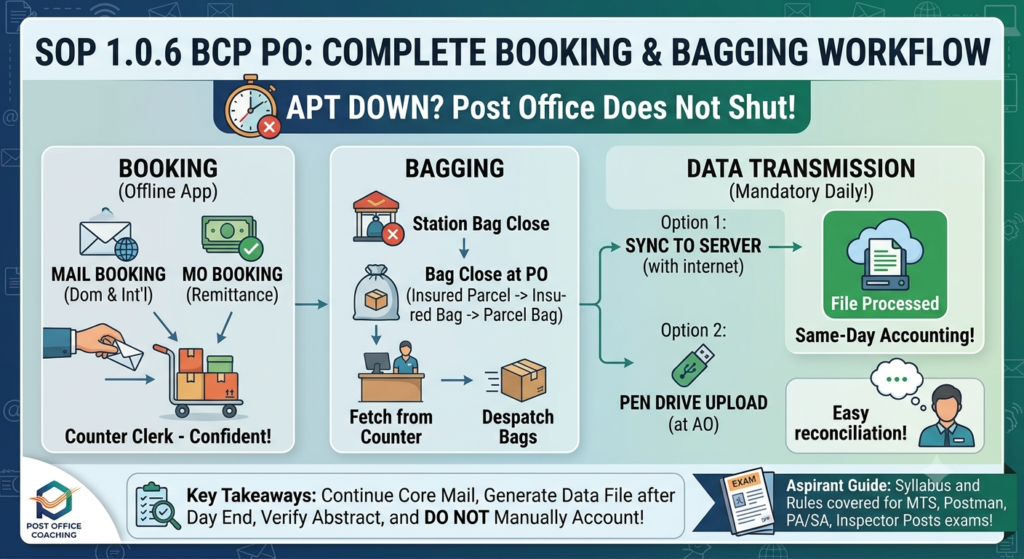
When APT 2.0 services go down, the post office does not shut. Counter staff switch to the BCP application — a separate offline application that lets you continue booking, bagging and bag despatch until the main system is back.
CEPT has issued an updated Standard Operating Procedure, SOP on BCP PO version 1.0.6 dated 20.08.2026, covering the Booking and Bagging modules.
This guide explains the complete workflow in plain language, in the order you will actually perform it. It is useful for counter PAs, SPMs, supervisors and anyone preparing for an India Post departmental promotion exam.
Quick Summary Table
| Point | Detail |
|---|---|
| Document | Standard Operating Procedure (SOP) — Advanced Postal Technology (APT) |
| Subject | Business Continuity Plan (BCP) for Post Offices — Booking and Bagging |
| Version | BCP PO 1.0.6 |
| Dated | 20 August 2026 |
| Issued by | CEPT |
| Purpose | Continue core mail operations when APT 2.0 services are down |
| Scope | Booking, Bagging and Bag Despatch only |
| Built in | Flutter (desktop application) |
| Device requirement | Works only on devices registered through the Device Registration Application |
| Modules | Master Data, Day Begin, Booking, Bagging, Day End, Data Transmission |
| Daily sync | Mandatory, for same-day accounting |
⚠️ Read the SOP’s own disclaimer: the operational guide is an illustration for using the software effectively. For any doubt on departmental rulings and guidelines, refer to the respective manuals and volumes only. The APT Operational Guide should not be cited as Rulings.
What BCP Can and Cannot Do
This is the first thing to be clear about, because misunderstanding it causes real problems at the counter.
✅ Available in BCP
- Booking — domestic and international mail articles
- Money Orders — Money Remittance booking
- Bagging — fetch from counter, close bags, despatch bags
- Reports — article, money order, bag reports, manifests, tracking
❌ NOT available in BCP
The SOP lists these as out of scope for offline operations:
- IPPB transactions
- POSB transactions
- PLI transactions
- Delivery
- Treasury, etc.
So if APT is down, savings bank work, insurance work, IPPB and delivery cannot be done through this application. Only core mail operations continue.
Before You Start: Installation Rules
Three rules from the SOP that matter more than they look.
1. Uninstall the old version first. Close any open BCP application, then uninstall the existing version before installing the new one. The SOP warns that skipping this may result in missing critical updates, new features and the latest master data changes.
2. Always install the latest version WITH the most recent master data. The application and the master data go together. An updated application running on stale master data will give wrong tariffs and wrong office lists.
3. Registered devices only. The application works only on devices registered through the Device Registration Application. You cannot simply install it on any computer.
Initial setup
After installing, enter:
- Office ID
- Office Name
- Office PIN Code
- Office Type
- Employee ID
- Employee Name
- Default password (as provided in the SOP)
On first login the system forces a password change. Enter and confirm the new password, then click Reset and Continue.
After login, the Master Data page appears. Upload the offline master data (via pen drive). Once the ZIP extracts and imports successfully, initial setup is complete.
🔒 Security note: the default password and portal credentials appear in the official SOP. Do not share them in staff WhatsApp or Telegram groups, and change the default password immediately as the application requires. Treat them the same way you treat your CSI login.
The Complete Daily Workflow
Here is the full sequence. Do it in this order — several steps are blocked until the previous one is complete.
| Step | Action | Notes |
|---|---|---|
| 1 | Day Begin | Starts with zero balances |
| 2 | Booking | Mail articles and Money Orders |
| 3 | Submit Account (Booking) | Closes the booking module for the day |
| 4 | Fetch from Counter | Pulls booked, returned and redirected articles |
| 5 | Station Bag Close | For station bag articles |
| 6 | Bag Close at PO | For bags to other offices/RMS |
| 7 | Bag Despatch | Generates Mail List ID |
| 8 | Bagging Abstract Verification | Requires Booking Submit Account done |
| 9 | Bagging Submit Account | Closes the bagging module |
| 10 | Day End | Generates BCP files |
| 11 | Data Transmission | Sync or upload — mandatory daily |
Step 1: Day Begin
- Select the Day Begin card to start operations.
- The day begins with zero balances.
- Once Day Begin is successful, the remaining cards — Booking, Bagging, Day End — become visible and accessible.
After Day Begin, check the wallet balance by clicking the Rupee symbol.
Step 2: Booking
Domestic Mail Booking
Mail service types supported include Speed Post Parcel Domestic, Inland Speed Post Document, India Post Parcel Retail and Gyan Post.
Procedure:
- Select Domestic Mail Booking under the Booking card.
- Enter:
- Destination Pincode
- Booking Type — Walk-in Customer or On Postal Service
- Mail Service Type
- Physical Weight
- Article Barcode Number
- Value Added Services (VAS) — COD Retail, POD/ACK, Insurance, etc.
- Click Next and enter Sender and Receiver Address.
- Tick “Retain Details for Next Booking” to reuse the same address for the next article.
- Add the article to the Cart.
- Click New Item to book another article, or Checkout for payment.
- On successful payment, the receipt is generated and the amount is added to the wallet.
💡 Practical tip: “Retain Details for Next Booking” is a real time-saver for bulk customers booking multiple articles to the same address. Most staff never notice the checkbox.
Money Order Booking
- Select Money Remittance under the Booking card.
- Enter:
- Destination Pincode
- MO Type
- MO Value
- Message
- Delivery Instructions
- Click Next and enter sender and receiver details.
- Click Add to Cart.
- Click New Item for another MO, or Checkout to pay.
Commission is shown on screen before confirmation. On successful payment a receipt is generated and the amount goes to the wallet for daily accounting.
Step 3: Submit Account (Booking Closure)
Once all booking transactions are done, you must submit the account to finalise the booking module for the day.
- Click Submit Account under the Reports card in the Booking module.
- The screen shows the Employee ID of the official.
- Click View to review the day’s Receipts and Payments.
- Verify, then click Submit Account. Confirm on the prompt.
- Once submitted, the Print button is enabled — generate a PDF copy for records.
⚠️ The accounting note you must not miss
The SOP is explicit on this, and it is the single most important line in the document:
Booking Submit Account figures will be reflected in the Daily Account automatically after APT is UP and the files are successfully consumed. Only if the figures are not reflected even after consumption of files due to a technical issue should they be accounted at the Treasury end with the respective account codes under mismatch entry. The BCP application is not dealing with the accounting portion.
In plain words: do not manually account BCP figures by default. Wait for APT to come up and the files to be consumed. Manual Treasury-end entry is the exception for technical failure, not the routine.
Staff who account manually and have the files consumed automatically will create double entries. That is a reconciliation problem nobody enjoys fixing.
Step 4: Fetch from Counter
Do this after completing all booking, article returns and BO returns.
- Click the Bagging card.
- Select the Fetch from Counter sub-card.
- Select Counter in the Select Type box and click Fetch. All booked articles appear.
- Select all articles and click Accept Articles.
- Click Receive to complete the process.
This fetches all booked, returned and redirected articles into the bagging module.
Step 5: Station Bag Close
After fetching, articles belonging to the station bag appear under Station Bag Close.
- Click Bagging → Station Bag Close.
- Expected articles show in the Expected Articles table.
- Scan each article one by one so it moves to the Scanned Articles table.
- Click Close Bag. Enter the Bag Number and Bag Weight in grams.
- Click Bag Close to generate and print the Station Bag manifest.
Step 6: Bag Close at PO
For bags going to other offices or to RMS.
- Click Bagging → Bag Close at PO.
- Enter:
- Select To Office Name
- Select Bag Type — Speed Bag, Parcel Bag, etc.
- Delivery Type — TD or NTD
- Include Bag — tick this if you are putting a bag inside this bag. Then select the included bag type, enter its weight in grams, select the event type, scan the bag number and click Add.
- Scan Article Number → click Add. The article is listed in the table.
- Add all articles by scanning.
- Click Close. Enter Bag Number and Bag Weight in grams.
- Click Bag Close to generate and print the Close Bag manifest.
📌 Insured Parcel rule — remember this one
The SOP states it clearly:
Insured Parcel articles are to be closed in an Insured Parcel bag, and that bag is then added to the Parcel Bag.
So it is a two-stage process: insured articles into an insured bag, then that insured bag goes inside the parcel bag using the Include Bag option. Getting this wrong is a common error and it shows up at the receiving office.
Step 7: Bag Despatch
After all bags are closed:
- Click Bagging → Bag Despatch.
- Select the Schedule for despatch.
- Scan or enter the closed bag numbers.
- Click Add to add each entry to the despatch table.
- Click Despatch — this generates the Mail List ID.
- Click Print to print the Mail List, which serves as the despatch record.
Reports Available in the Bagging Module
| Report | What it shows | How to reach it |
|---|---|---|
| Bag Reports | Bags received, opened, closed, dispatched | Bagging → Bag Reports → select type and date → Fetch |
| Article Reports | Articles received, dispatched, fetched from counter | Bagging → Article Reports → select type and date → Fetch |
| Re-Print Mail List | Reprints a Mail List | Bagging → Re Print Mail List → enter Mail List ID |
| Bag Tracking | Local tracking of a bag | Bagging → Bag Tracking → scan bag number → Track |
| Bag Close Manifest | Reprints a closed bag manifest | Bagging → Bag Close Manifest → scan bag number → Print |
💡 Where to find a Mail List ID: it is available in Bag Reports → Bag Dispatched Report. Note it down at despatch time and you will not have to hunt for it later.
Step 8: Bagging Abstract Verification
⚠️ This requires the Booking Submit Account to be completed first.
- Click Bagging Abstract Verification under the Bagging module.
- The screen compares:
- Dispatched articles
- Articles received from the Booking module (Counter)
- Review the abstract carefully for mismatches.
- If the details tally correctly, click Verify to proceed to Bagging Module Submit Account.
This step ensures all article movements are reconciled before submission and final accounting. Do not rush it. A mismatch caught here is a five-minute fix; the same mismatch found after Day End is a much longer conversation.
Step 9 & 10: Bagging Submit Account and Day End
After Bagging Submit Account is complete, perform Day End.
- Click the Day End button.
- A confirmation appears: after ending the day, no further transactions will be allowed.
- On completion, the message confirms: file saved in Downloads/BCP, and asks you to transmit and back up the data.
The screen also shows the date and time of the last completed Day End, which is a useful check if you are unsure whether yesterday was closed properly.
Step 11: Data Transmission — The Step People Forget
This is mandatory and it is where offices most often slip.
Important: the Data Transmission file must be generated after Day End only.
Once Day End is done, the Data Transmission card shows “Generate Today’s File”. Click it to generate the files, which are saved in the Downloads/BCP Files folder.
Two ways to transmit
Option 1 — Sync to Server (recommended) If internet is available, click “Sync to Server”. The file syncs directly to the BCP server. The SOP explicitly recommends this method. A confirmation message appears when the file syncs successfully.
Option 2 — Pen drive upload (no internet) If there is no network, the Sync button cannot process the files. In that case:
- Copy the generated files to a pen drive.
- Take it to the nearest network-enabled office — usually the AO. The Divisional Office Authority has been given the provision to upload the generated file.
- Click the Upload File card → Upload BCP file.
- Click Choose File, select the BCP file, click Upload. A confirmation message appears.
- The uploaded file is displayed with an Upload action — click it to complete the upload.
Checking the status
Upload status is visible through File Transmission Dashboard and BCP Dashboard under the BCP Management card.
The file moves through these stages:
| Status | Meaning |
|---|---|
| File Received | The file has reached the server |
| File Processed | The back-end has processed it; data is then uploaded to IT 2.0 servers |
📌 Daily File Sync/Upload is mandatory for same-day accounting. An office that books all day and forgets to transmit has effectively done the work twice — once at the counter, and again at reconciliation.
Troubleshooting
The SOP gives two points:
- Install AnyDesk for remote support.
- If issues arise, the device should be brought to a network-enabled location.
Beyond that, escalate through your divisional System Administrator. Do not attempt fixes on your own — a broken BCP installation during an outage is the worst possible time to experiment.
Common Mistakes to Avoid
Collected from the SOP’s own warnings:
- ❌ Installing a new version without uninstalling the old one
- ❌ Installing the application without the latest master data
- ❌ Trying to run it on an unregistered device
- ❌ Attempting IPPB, POSB, PLI, delivery or treasury work in BCP — not supported
- ❌ Generating the Data Transmission file before Day End
- ❌ Forgetting to sync or upload the file the same day
- ❌ Closing insured parcel articles directly into a parcel bag instead of an insured bag first
- ❌ Manually accounting BCP figures at Treasury end when APT would have consumed them automatically
- ❌ Running Bagging Abstract Verification before Booking Submit Account
Why Exam Aspirants Should Read This
IT and system topics are appearing more often in departmental exam papers, and BCP is a clean, examinable subject.
One-liners worth memorising:
BCP (Business Continuity Plan) is the offline application used to continue core mail operations — booking, bagging and bag despatch — when APT 2.0 services are down.
IPPB, POSB, PLI, delivery and treasury operations are NOT available in BCP.
The Data Transmission file can be generated only after Day End, and daily sync or upload is mandatory for same-day accounting.
Terms worth knowing:
| Term | Meaning |
|---|---|
| APT | Advanced Postal Technology |
| BCP | Business Continuity Plan |
| Master Data | Reference data — offices, tariffs, PIN codes — uploaded offline |
| Day Begin / Day End | Opening and closing of the working day in the application |
| Submit Account | Closure of a module’s transactions for the day |
| Mail List ID | The identifier generated on bag despatch |
| TD / NTD | Delivery type options at bag close |
| Mismatch Entry | Treasury-end accounting route used only when files do not reflect automatically |
Useful across the ladder — GDS to MTS, GDS to Postman/Mail Guard, MTS to PA/SA, Postman to PA/SA and Inspector Posts LDCE.
Candidates who actually work the counter have a real advantage here. You already do these steps. Convert the muscle memory into written answers.
Frequently Asked Questions (FAQ)
Q1. What is the BCP application in India Post? It is an offline application that lets post offices continue core mail operations — booking, bagging and bag despatch — when APT 2.0 services are down.
Q2. What is the latest BCP SOP version? SOP on BCP PO 1.0.6, dated 20 August 2026, covering the Booking and Bagging modules.
Q3. Can POSB or IPPB work be done in BCP? No. IPPB, POSB, PLI, delivery and treasury operations are out of scope for the BCP application.
Q4. Can I install BCP on any computer? No. It works only on devices registered through the Device Registration Application.
Q5. Do I need to uninstall the old BCP version before installing a new one? Yes. Close and uninstall the existing application first, then install the latest version along with the most recent master data.
Q6. How is master data uploaded in BCP? Through the Master Data card, using offline upload via pen drive.
Q7. When can the Data Transmission file be generated? Only after Day End is completed.
Q8. What if there is no internet for syncing? Copy the generated files to a pen drive and upload them at the nearest network-enabled office, usually the AO, using the Upload File option on the BCP portal.
Q9. Will BCP booking figures come into the Daily Account automatically? Yes — automatically, once APT is UP and the files are successfully consumed. Only if they do not reflect due to a technical issue should the figures be accounted at Treasury end under mismatch entry. The BCP application does not deal with the accounting portion.
Q10. How are insured parcel articles bagged in BCP? Insured Parcel articles are closed in an Insured Parcel bag, and that bag is then added to the Parcel Bag using the Include Bag option.
Q11. What is needed before Bagging Abstract Verification? The Booking Submit Account must be completed first.
Q12. Where can I check whether my transmitted file was processed? On the File Transmission Dashboard and BCP Dashboard under the BCP Management card. Status moves from File Received to File Processed.
Q13. Can this SOP be cited as a departmental ruling? No. The SOP itself states that the APT Operational Guide is an illustration only and should not be cited as Rulings. For rulings, refer to the respective manuals and volumes.
Related Reading on Postoffice Coaching
- What is BCP in IT 2.0? Business Continuity Plan Explained
- Paperless Branch Offices under IT 2.0 — Directorate Proposal
- Sabarkantha Division Non-Delivery Branch Offices
- GDS to MTS Departmental Exam — Syllabus and Study Material
- MTS to PA / SA and Postman to PA / SA Departmental Exam Course
- Inspector Posts LDCE — Syllabus and Selection Procedure
- India Post Circulars and Latest News
Final Word
The BCP workflow is long but strictly sequential. Learn the order once and it becomes routine:
Day Begin → Booking → Submit Account → Fetch from Counter → Close Bags → Despatch → Verify → Bagging Submit Account → Day End → Transmit.
Three things to remember above everything else:
- Transmit the file every single day. Same-day accounting depends on it.
- Do not manually account BCP figures unless the files genuinely failed to consume.
- Insured parcel into insured bag first, then into the parcel bag.
Get those three right and the rest is just following the screens.